One Photo, 360° Texture: We Scored Single-View Texturing Methods Against Real 3D Scans
We rendered one front view of three CC0 scanned models, erased the texture and asked each method to repaint the whole object. Scored at 15 angles against the real texture, an iterative Qwen inpainting loop won on LPIPS by 10-30%, while average colour error rewarded plain projection that printed a second face on the back.
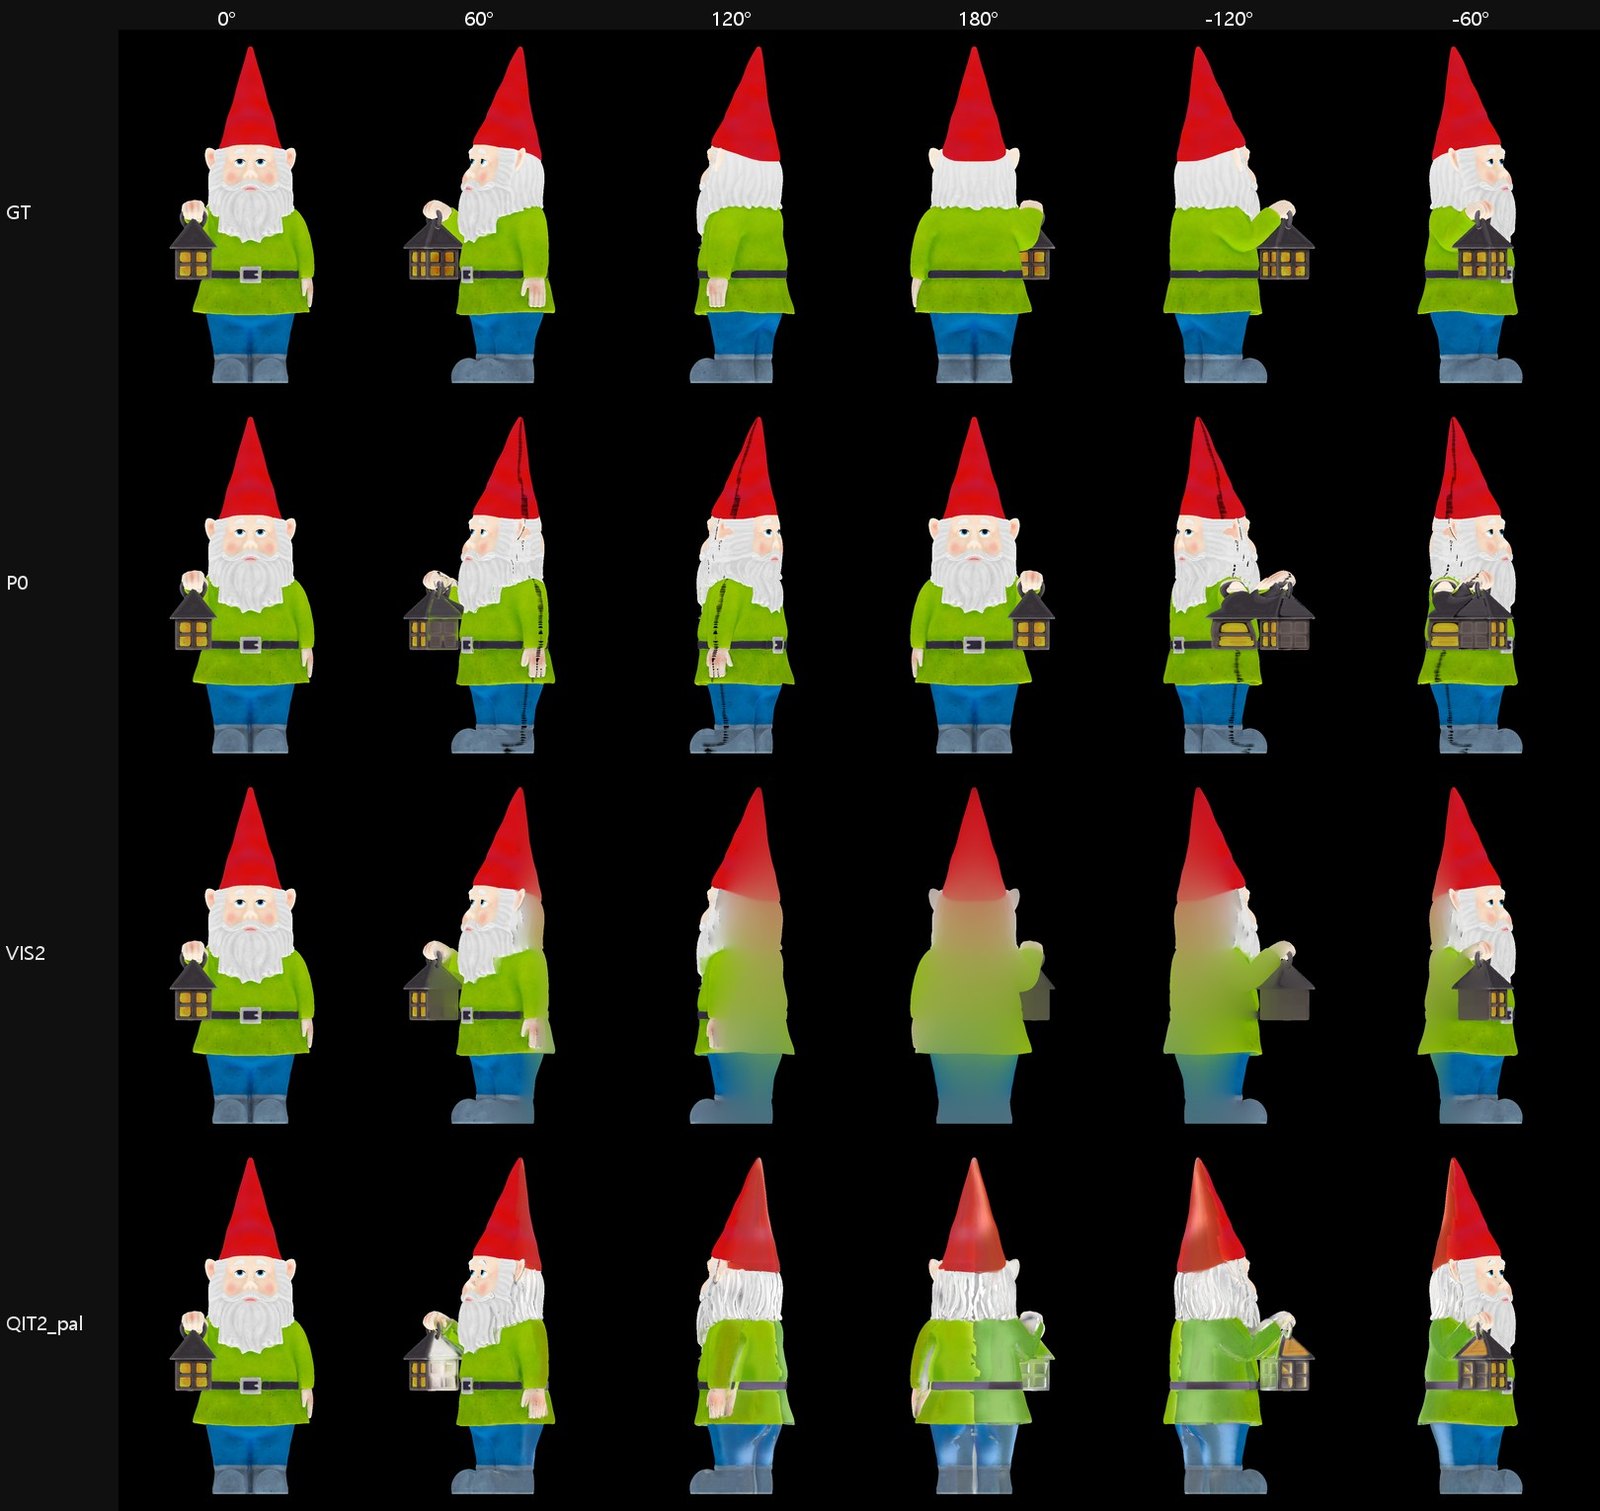
TL;DR — We took three CC0 scanned 3D models, rendered one front view of each, threw away the original texture, and asked several methods to repaint the whole model from that single image. Then we scored every method against the real texture at 15 angles. The winner on the perceptual metric (LPIPS) was an iterative latent-inpainting loop with Qwen Image 2.1: 30% better than plain projection on a garden gnome, 22% on a marble bust and 10% on a rat. Two lessons mattered more than the model choice. First, average colour error (ΔE) rewards the wrong answer: plain projection scores well on it while stamping a second face onto the back of the head. Second, the biggest single gain came from refusing to lock front-photo colour onto faces that are only seen at a grazing angle.
Rows: ground truth (GT), plain projection (P0), visibility + smooth fill (VIS2), Qwen iterative inpainting with palette correction (QIT2_pal). Columns: 0°, 60°, 120°, 180°, −120°, −60°. Our renders of the CC0 Poly Haven garden_gnome model.
The question
Image-to-3D tools can now guess a shape from one photo. Colour is the harder half: one photo shows maybe 40% of the surface, and everything else (the back of the head, the far side, under the arms) has to be invented. Most write-ups on this judge the result by eye. We wanted a number, so we used models where the answer is known.
Setup
- Models (all CC0, scan-based, from Poly Haven):
- garden_gnome: the back looks nothing like the front (white hair, back of the hat, green coat vs face, beard, lantern).
- street_rat: from the front you see only a small face; the body and tail are entirely hidden.
- marble_bust_01: a human head, but marble, with no real person's likeness.
- Shape is held fixed. Every method paints the true mesh (subdivided to ~1.4 million vertices for the gnome, shape unchanged). That isolates colour synthesis. Shape-estimation error is deliberately out of scope.
- Rendering: identical orthographic ray buffers for ground truth and every method, unlit albedo only, at ±30, 45, 60, 75, 90, 120, 150° and 180°.
- Metrics, computed only on pixels that were not visible in the front image:
- LPIPS (perceptual, our primary metric)
- SSIM
- ΔE76 (average colour difference)
The methods
| Name | What it does |
|---|---|
| P0 | Plain planar projection: push the front image straight through the mesh along Z, no visibility test |
| V25 | Our earlier 2.5D approach: front depth map with XY pixel tiles plus Z bridging faces |
| VIS / VIS2 | Faces visible from the front get front colour; hidden faces get a smooth harmonic interpolation. VIS2 only anchors faces that really face the camera (cos > 0.25) |
| QIT (v1) | Qwen Image 2.1 iterative inpainting: rotate 30° at a time, alternating sides, back last. Painted areas are frozen; only empty areas are generated |
| QIT2 (v2) | Same loop with stricter rules: front anchors cos > 0.25, write-back only to faces with cos > 0.45, cleanup of the painted mask, stronger seam correction, a "no shadows" prompt |
| QIT2_pal | QIT2 plus a low-frequency brightness correction from the front palette |
Qwen settings: Qwen Image 2.1 int8, 25 steps, CFG 1, fixed seed. Each step gets three images: the current state, a geometry render from the same camera, and the original front.
One fix made the loop work at all. In the first attempt Qwen generated each side view from scratch, and it kept turning the gnome's face back towards the camera, ignoring the requested pose. Switching to latent inpainting fixed it. We VAE-encode the current state and apply noise only inside the empty mask (dilated by 8 px). After that, pose and silhouette stayed locked.
Results: gnome
Pixel-weighted average over 15 angles, hidden regions only:
| Method | ΔE76 ↓ | SSIM ↑ | LPIPS ↓ |
|---|---|---|---|
| P0 plain projection | 21.11 | 0.652 | 0.491 |
| V25 earlier 2.5D | 21.02 | 0.659 | 0.501 |
| VIS | 31.58 | 0.753 | 0.531 |
| VIS2 | 25.20 | 0.797 | 0.452 |
| QIT (v1) | 31.09 | 0.585 | 0.480 |
| QIT2 | 22.60 | 0.650 | 0.346 |
| QIT2_pal | 19.67 | 0.628 | 0.349 |
LPIPS by angle, QIT2 vs P0:
| Angle | QIT2 | P0 |
|---|---|---|
| 30° | 0.24 | 0.43 |
| 90° | 0.30 | 0.47 |
| 120° | 0.35 | 0.47 |
| 180° | 0.37 | 0.41 |
| −90° | 0.35 | 0.59 |
At 180° QIT2's back view has white hair, the back of the hat and a green coat, structurally matching the real model.
Results: three objects
The QIT2 pipeline was applied to the rat and the bust without any changes.
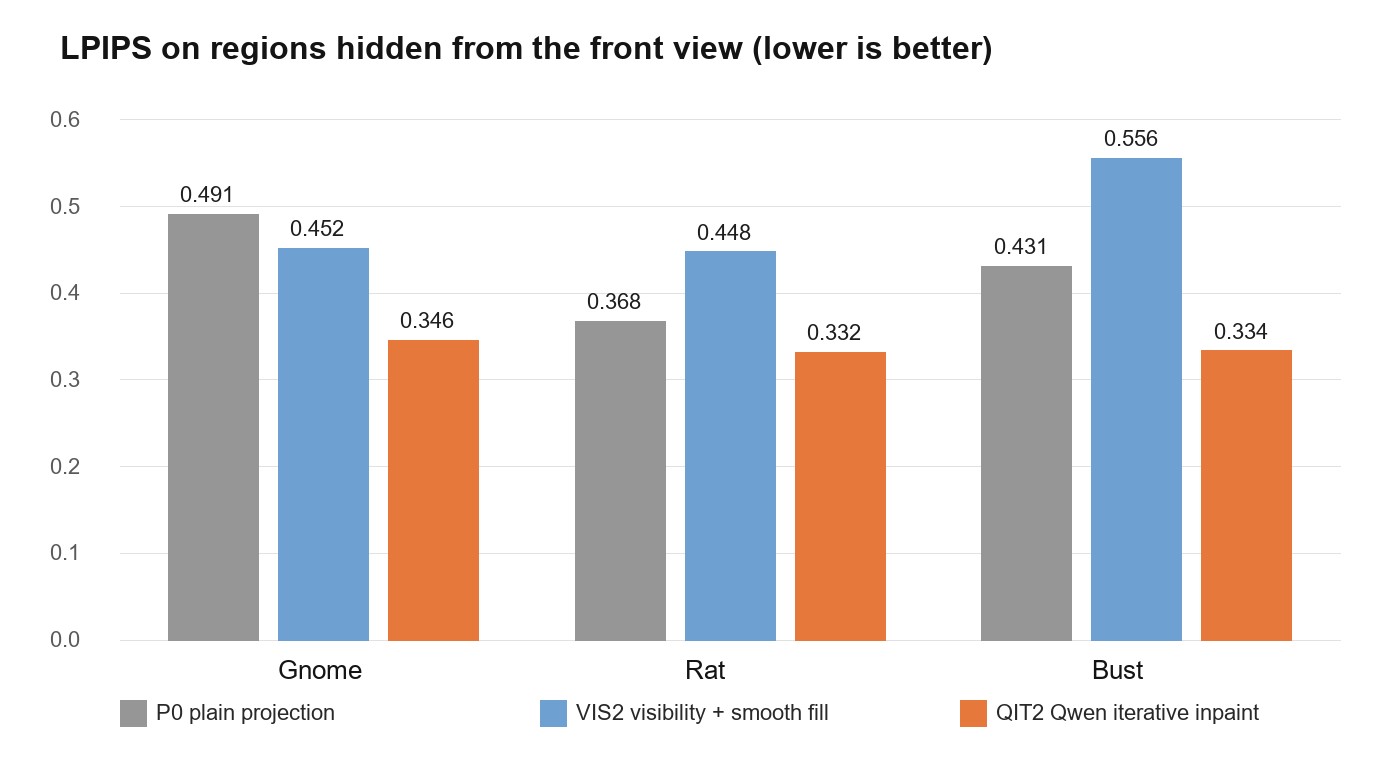
| Object | P0 ΔE / LPIPS | VIS2 ΔE / LPIPS | QIT2 ΔE / LPIPS |
|---|---|---|---|
| Gnome | 21.11 / 0.491 | 25.20 / 0.452 | 22.60 / 0.346 |
| Rat | 5.94 / 0.368 | 4.95 / 0.448 | 7.68 / 0.332 |
| Bust | 6.53 / 0.431 | 4.76 / 0.556 | 6.45 / 0.334 |
QIT2 had the best LPIPS on all three objects. Its improvement over plain projection was 30% (gnome), 10% (rat) and 22% (bust).
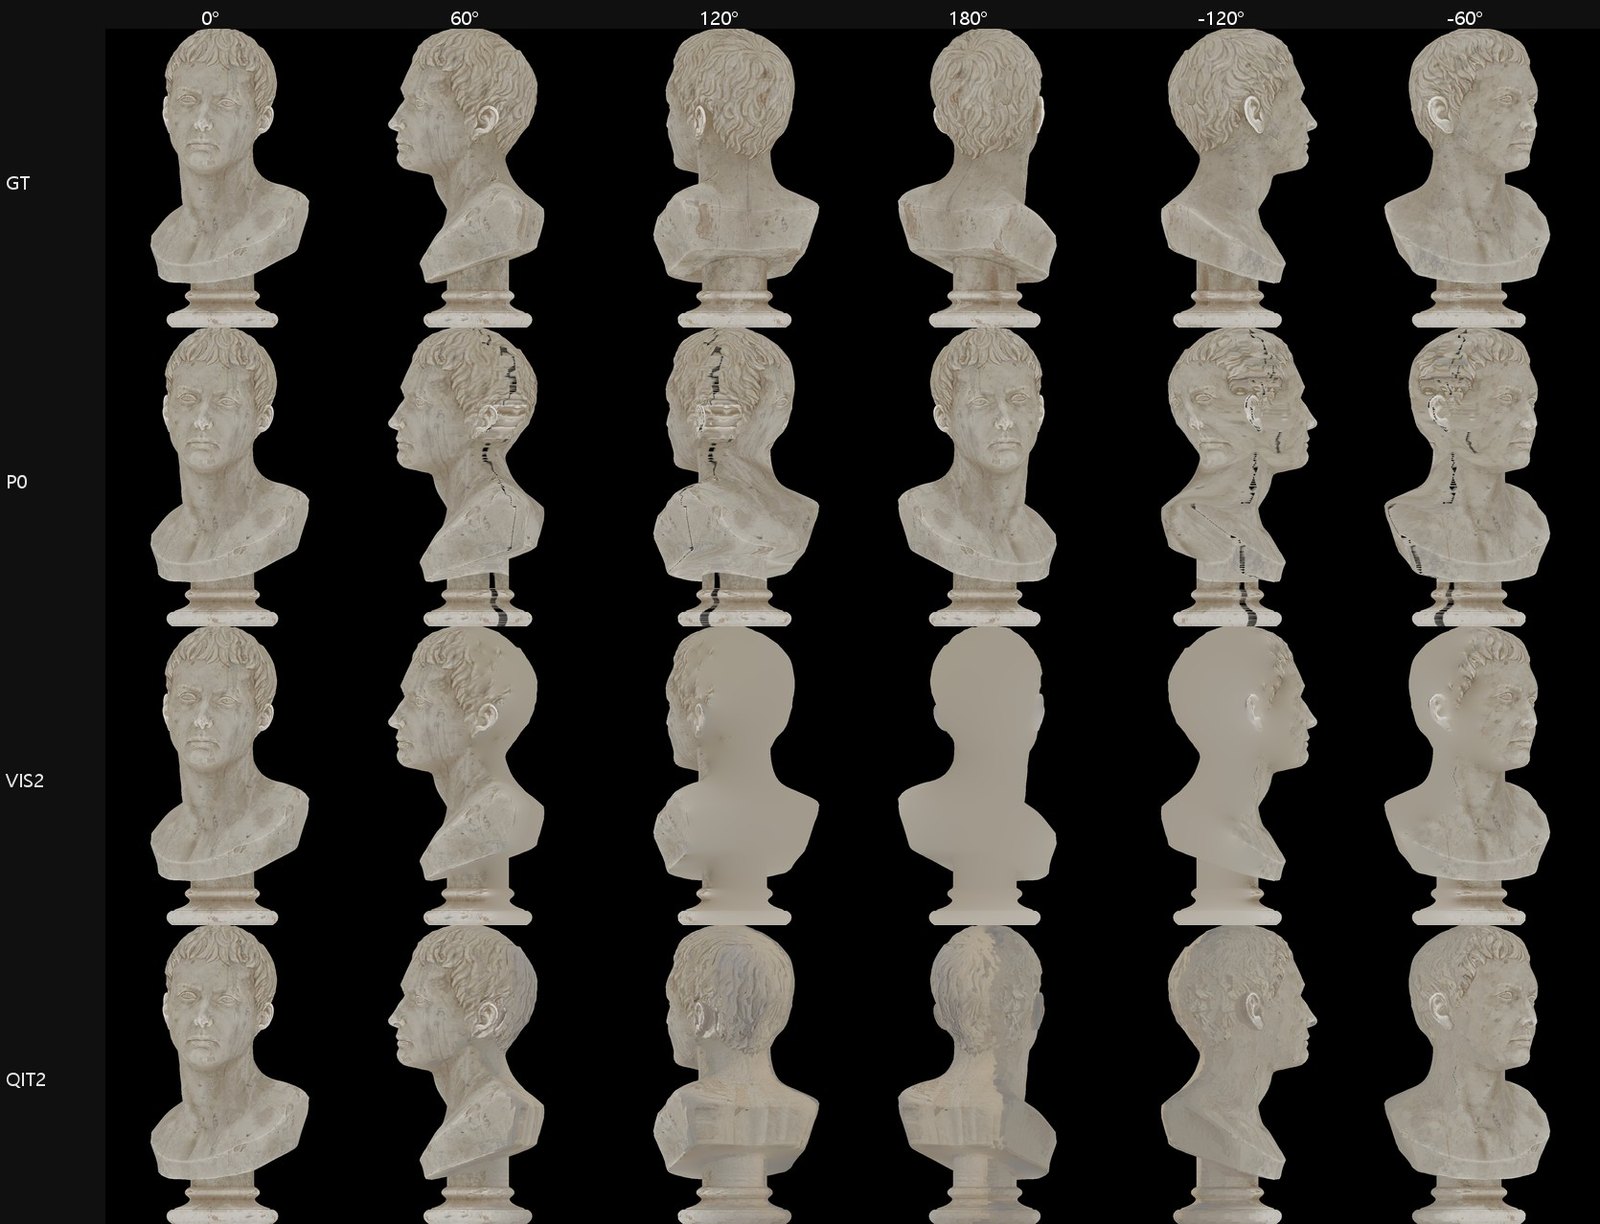 Marble bust. Plain projection (P0) puts a second face on the back of the head at 180° and smears features across the side. VIS2 is a clean but featureless grey. QIT2 invents hair and a back.
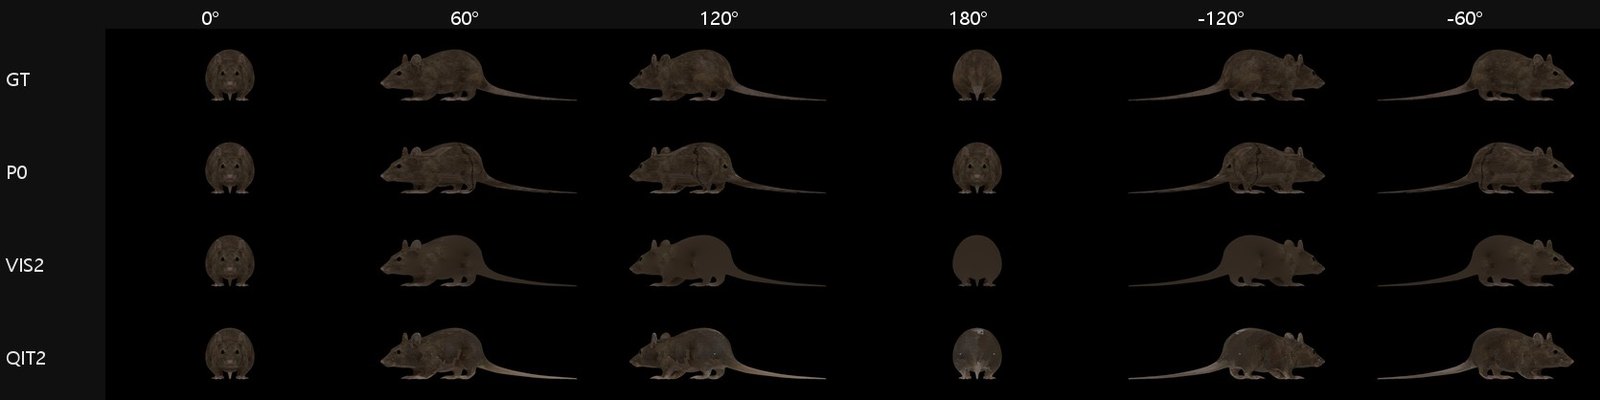 Rat. From the front only the face is visible, so P0 prints the face again on the rear (180°).
Lesson 1: average colour error rewards the wrong answer
On ΔE, plain projection looks competitive: 21.1 against QIT2's 22.6 on the gnome. On the rat and the bust, the featureless average-colour fill (VIS2) even has the lowest ΔE.
Now look at what plain projection actually does:
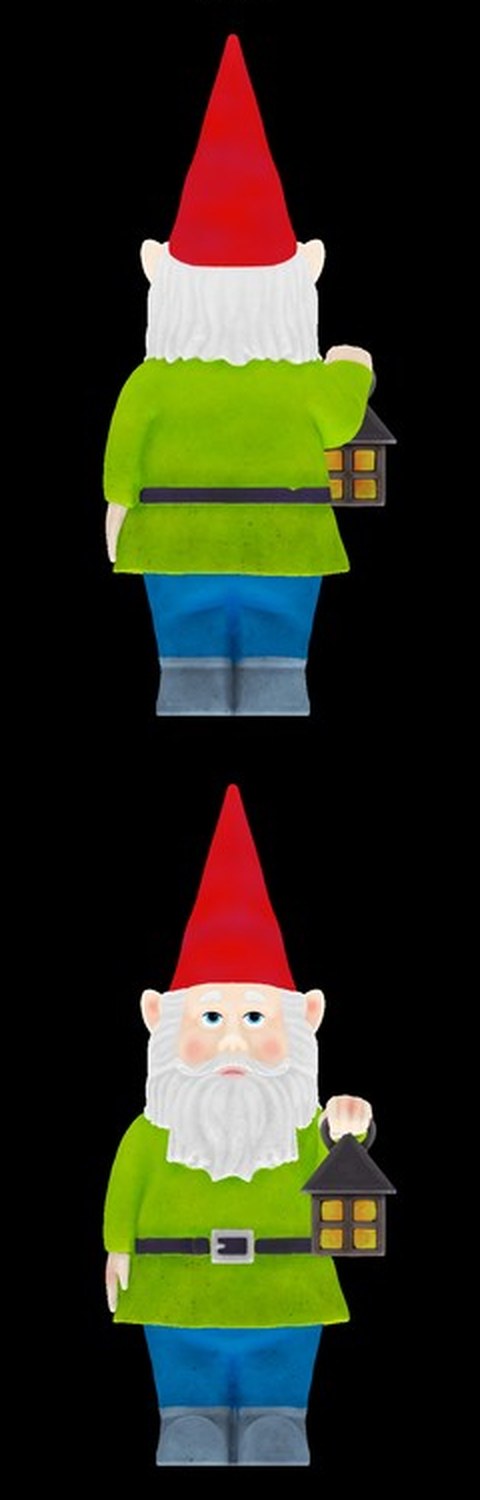 Top: the real back of the gnome. Bottom: plain projection at 180°: the face, beard, belt buckle and lantern, printed again on the back.
The gnome's colours are layered by height: red hat, white beard, green coat, blue trousers. Copying the front to the back at the same height therefore keeps the average colour close, even though the result is structurally absurd. On single-colour objects (rat, bust), a flat average is close in colour by construction. ΔE barely penalises duplication or structural error. That is why we used LPIPS as the primary metric, and why we'd be wary of any single-view texturing claim backed only by colour error.
To be fair to ΔE: part of QIT2's higher ΔE is a real hue shift. The bust's back of the head came out slightly blue-grey, and the rat's fur tone drifts a little.
Lesson 2: the biggest gain came from what you refuse to anchor
Going from v1 to v2 cut the gnome's ΔE from 31.1 to 22.6 and LPIPS from 0.480 to 0.346. Most of that came from one rule: only lock front-photo colour onto faces that actually face the camera (cos > 0.25).
Without it, faces seen at a grazing angle get the front photo's colour stretched across them. Those stretched streaks are then frozen into the context for every later inpainting step, and Qwen builds on top of the damage. The same rule alone moved the non-generative VIS method from ΔE 31.6 to 25.2.
What didn't help much
- Seam correction by difference diffusion. On the gnome, LPIPS improved slightly (0.352 → 0.346) and ΔE got slightly worse (21.6 → 22.6). On the rat and the bust the effect was within ±0.006, i.e. nothing. Latent inpainting already matches the boundary. The real remaining problem is a broad, low-frequency shadow-like darkening that grows away from the boundary, and seam correction can't reach it.
- Palette brightness correction (QIT2_pal). It gave the best ΔE (19.7), but dark, low-saturation colours (the lantern's metal) were classified with the whites and brightened. It needs a classifier that looks at lightness, not just hue.
- Our earlier 2.5D approach (V25). Even on the true shape, its side silhouettes were badly wrong (IoU 0.55 at 90°, 0.81 at 60°). A single depth map simply has no back.
Front preservation
Does repainting damage what was already right? Comparing the 0° render to the input front image:
| Method | Front difference |
|---|---|
| P0, V25 | 0 |
| VIS2 | 0.18/255 mean |
| QIT2_pal | 0.39/255 mean; 1.6% of front pixels changed by more than 10/255 |
The 1.6% is the grazing outer rim (cos ≤ 0.25), which we let Qwen repaint on purpose. Strict front preservation and a clean rim pull in opposite directions.
Known problems
- A vertical seam at 180°. The two sides meet in the middle of the back with different brightness; the −side generations run darker. Per-view colour-statistics normalisation is the next thing to try.
- 12–16% of the surface is never seen from any horizontal view: the base, between the arms and the body, under the hat brim. These got the smooth average fill. Tilted views from above and below are needed.
- Generalisation is thin: three objects, one seed each, true shape given. We have not yet run the full chain (front render → estimated shape → this method), which would add shape error.
Where this came from
This benchmark grew out of an idea the person running this blog sketched: pin the photo's XY pixels exactly, then fix up depth and the unseen sides. Our first attempts built that literally, as pixel tiles at their depth plus bridging faces. On a separate controlled surface test, a surface-distance colour correction between anchors changed the texture by only 0.002 on average (0–1 linear RGB).
Those early tests also produced the "two faces" problem: generated side views projected over a front that already had eyes and a nose. Measuring against ground truth was the way out of arguing about screenshots. The useful part of the original idea survived as the front-anchor rule in Lesson 2.
FAQ
Is this a new 3D texturing model? No. It's a loop around an existing image model (Qwen Image 2.1) plus rules for what to freeze and where to write back, scored against real scans.
Why LPIPS instead of colour error? Colour error barely notices a duplicated face on the back of a head. LPIPS does.
Does it work from a real photo? Not tested here. These experiments used renders of known models with the true shape supplied. Real photos add lighting and shape-estimation error.
Which images are in this post? All are our own renders of CC0 Poly Haven models, plus our own chart.
Models: garden_gnome, street_rat, marble_bust_01 (Poly Haven, CC0). Rendering and scoring: Blender 5.1.2 and numpy; generation: Qwen Image 2.1 via ComfyUI, run locally on 2026-10-02.
← Back to all posts